Back up and restore
When it comes to photos and videos, backups are extremely important. To learn what a complete Immich backup consists of, why both the database and the files are required, and how to keep them consistent, see Backups and the 3-2-1 backup method.
This page covers the mechanics: preparing the database for backup, which files to copy, and how to restore. A template bash script that can be run as a cron job is provided here.
The instructions on this page show you how to prepare your Immich instance to be backed up, and which files to take a backup of. You still need to take care of using an actual backup tool to make a backup yourself.
Database
Automatic Database Backups
Immich automatically creates database backups for disaster-recovery purposes. These backups are stored in UPLOAD_LOCATION/backups and can be managed through the web interface.
You can adjust the backup schedule and retention settings in Administration > Settings > Backup (default: keep last 14 backups, create daily at 2:00 AM).
Database backups do not contain photos or videos — only metadata. They must be used together with a copy of the files in UPLOAD_LOCATION as outlined below.
Creating a Backup
You can trigger a database backup manually:
- Go to Administration > Job Queues
- Click Create job in the top right
- Select Create Database Dump and click Confirm
The backup will appear in UPLOAD_LOCATION/backups and counts toward your retention limit.
Restoring a Database Backup
Immich provides two ways to restore a database backup: through the web interface or via the command line. The web interface is the recommended method for most users.
Restore from Settings
If you have an existing Immich installation:
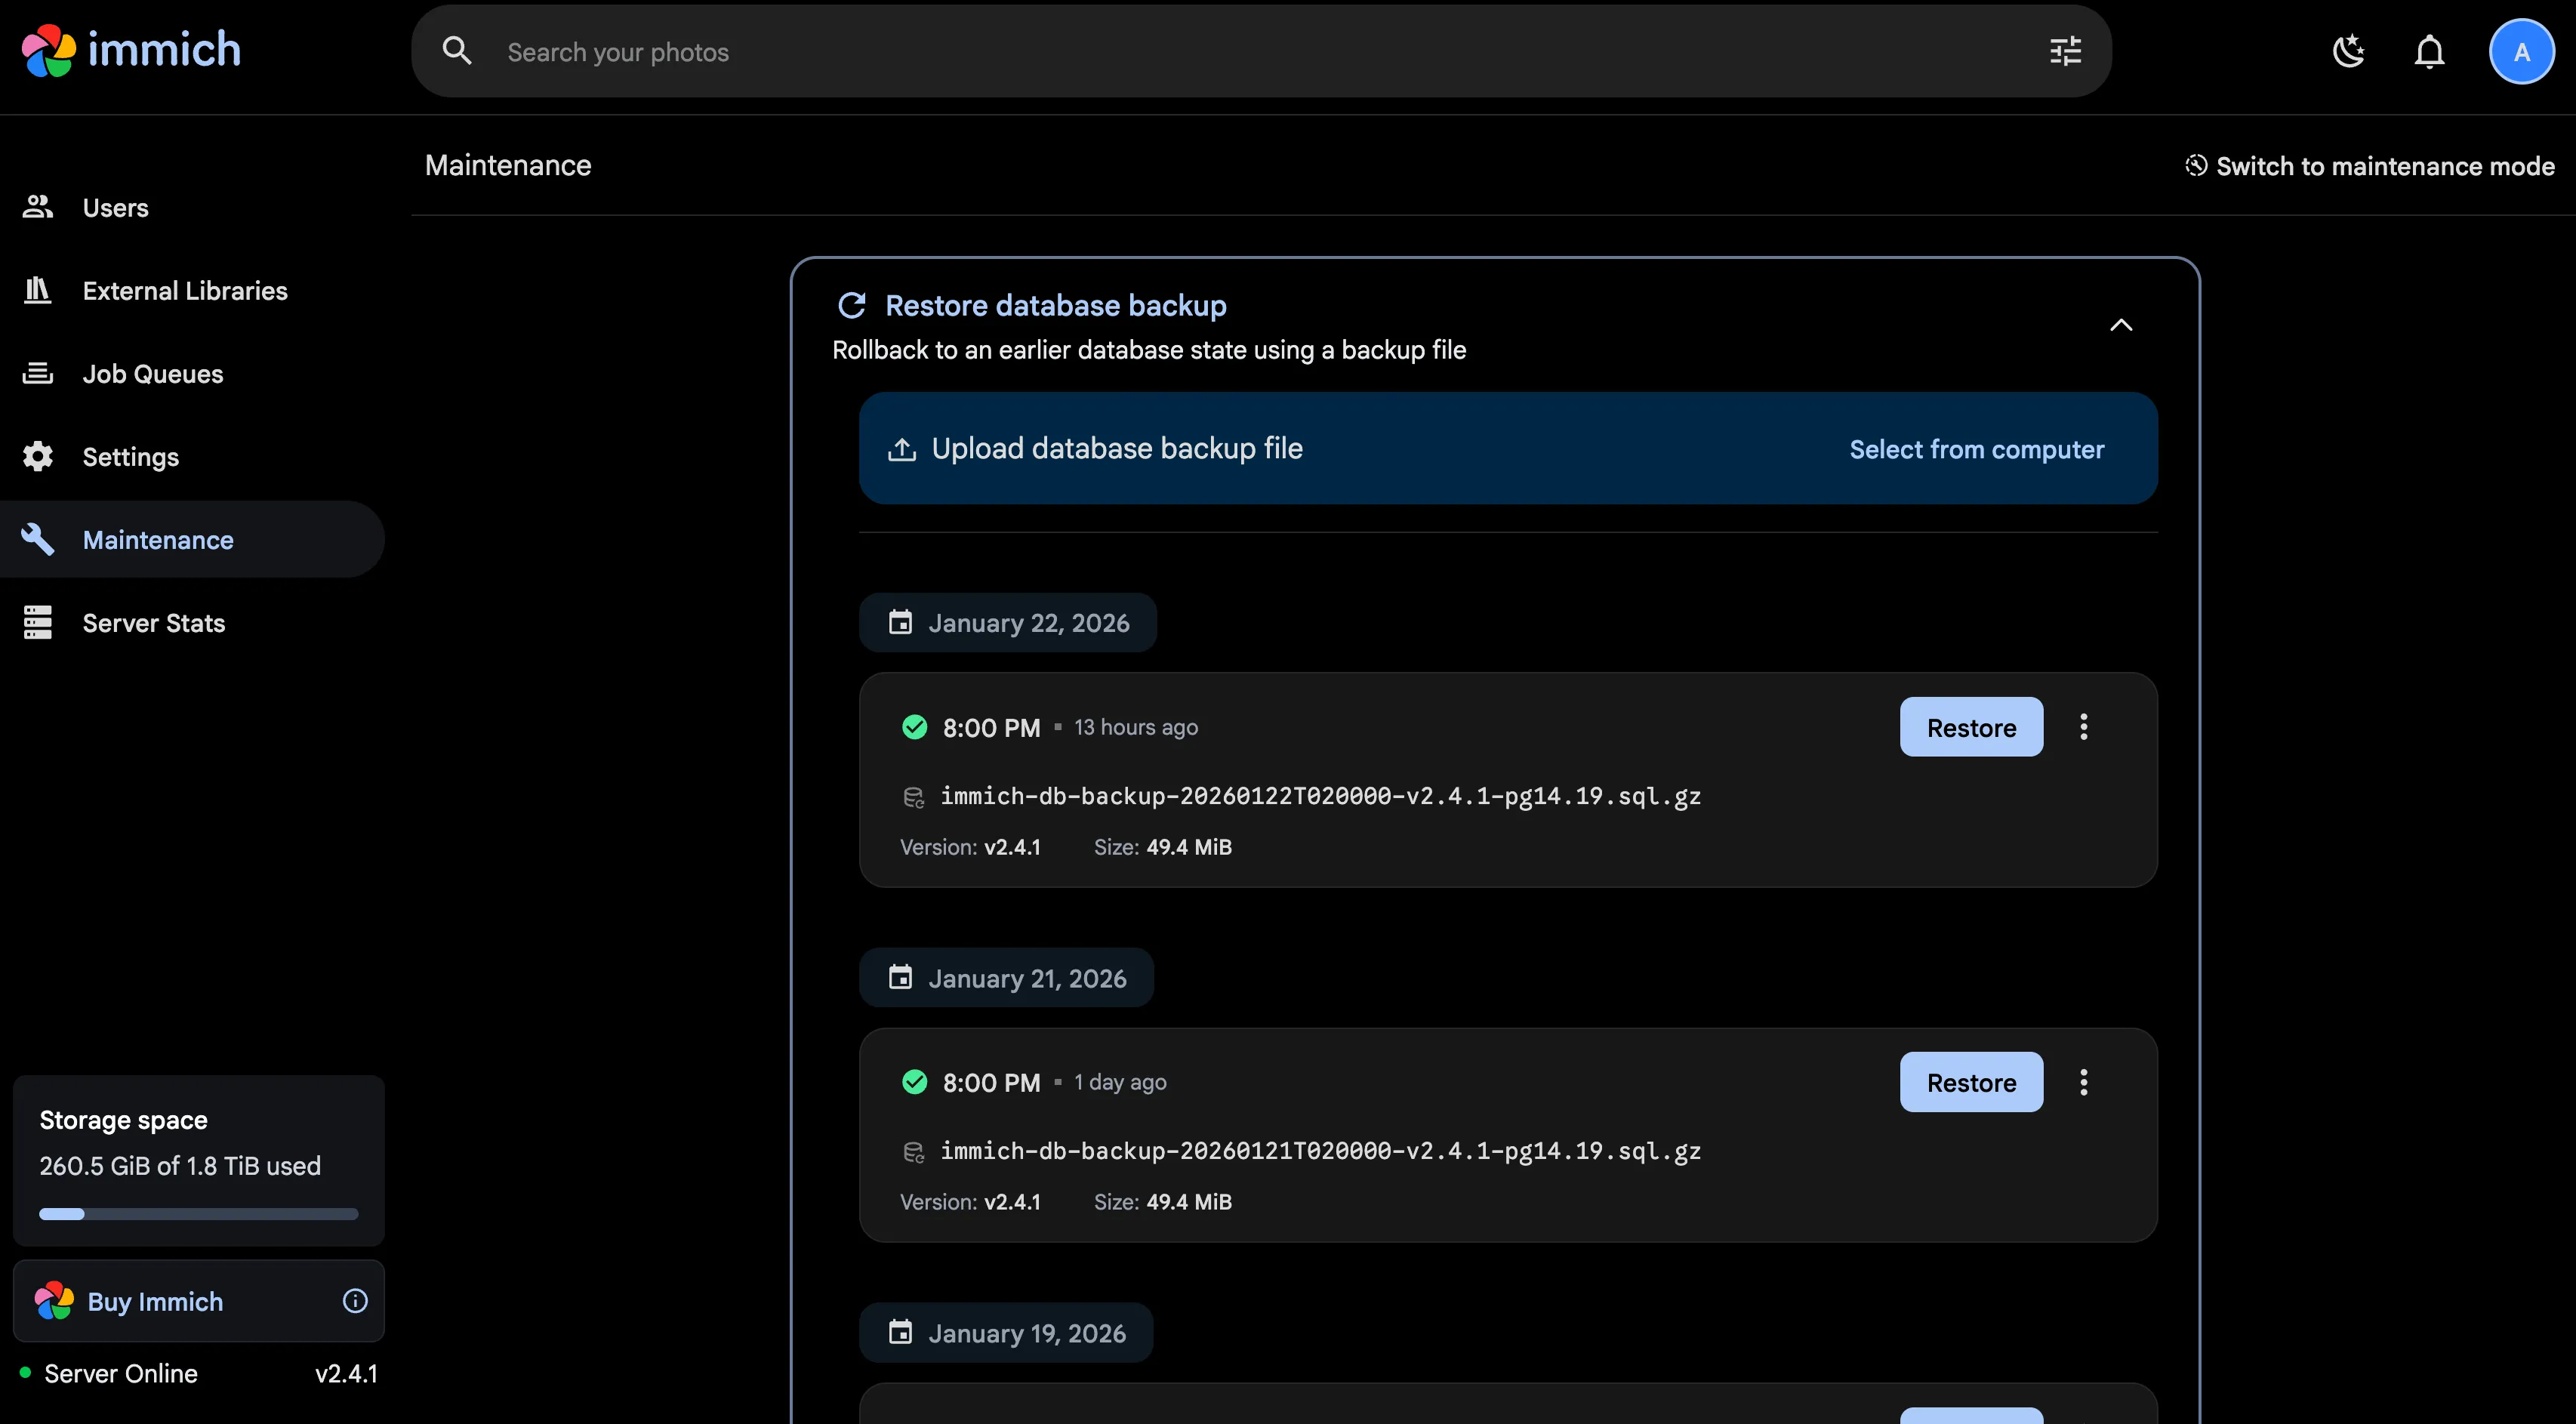
- Go to Administration > Maintenance
- Expand the Restore database backup section
- You'll see a list of available backups with their version and creation date
- Click Restore next to the backup you want to restore
- Confirm the restore operation
Restoring a backup will wipe the current database and replace it with the backup. A restore point is automatically created before the operation begins, allowing rollback if the restore fails.
Restore from Onboarding
If you're setting up Immich on a fresh installation and want to restore from an existing backup:
- Download and populate
.envanddocker-compose.ymlas per the installation instructions. - Move the previous's instance data directories containing
backups,encoded-video,library,profile,thumbsanduploadinto the newUPLOAD_LOCATION - (For external libraries) If you used external library feature in your previous instance, make sure that the mount settings in your new
docker-compose.ymlreflect the same structure. You may need to move files accordingly.
Assuming your previous UPLOAD_LOCATION was UPLOAD_LOCATION=/my-broken-instance/media and your new one is UPLOAD_LOCATION=/a-brand-new-instance/data, you will need to perform the following file moves:
/my-broken-instance/media/backups          ->    /a-brand-new-instance/data/backups
/my-broken-instance/media/encoded-video    ->    /a-brand-new-instance/data/encoded-video
/my-broken-instance/media/library          ->    /a-brand-new-instance/data/library
/my-broken-instance/media/profile          ->    /a-brand-new-instance/data/profile
/my-broken-instance/media/thumbs           ->    /a-brand-new-instance/data/thumbs
/my-broken-instance/media/upload           ->    /a-brand-new-instance/data/upload
- Start the Immich services with
docker compose up -d
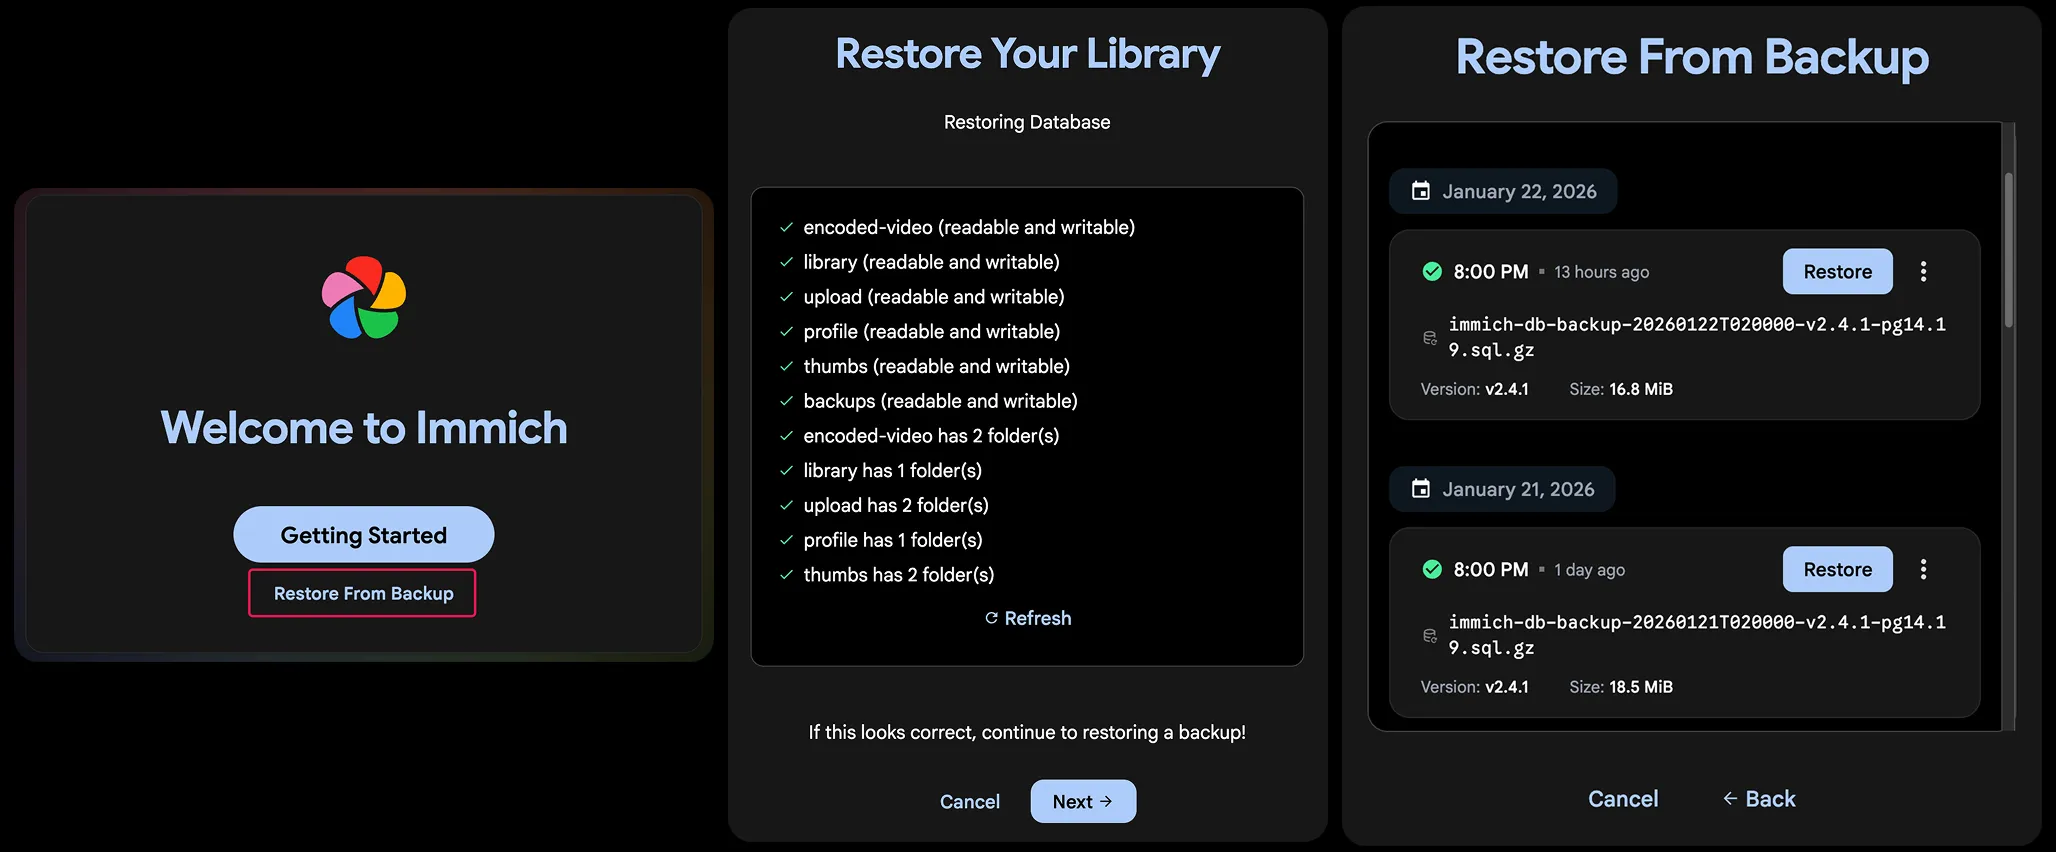
- On the welcome screen, click Restore from backup
- Immich will enter maintenance mode and display integrity checks for your storage folders
- Review the folder status to ensure your library files are accessible
- Click Next to proceed to backup selection
- Select a backup from the list or upload a backup file (
.sql.gz) - Click Restore to begin the restoration process
Before restoring, ensure your UPLOAD_LOCATION folders contain the same files that existed when the backup was created. The integrity check will show you which folders are readable/writable and how many files they contain.
Uploading a Backup File
You can upload a database backup file directly:
- In the Restore database backup section, click Select from computer
- Choose a
.sql.gzfile - The uploaded backup will appear in the list with an
uploaded-prefix - Click Restore to restore from the uploaded file
Backup Version Compatibility
When viewing backups, Immich displays compatibility indicators based on the current version and the information from the filename:
- Backup version matches current Immich version
- Backup was created with a different Immich version
- Could not determine backup version
Restoring a backup from a different Immich version may require database migrations. The restore process will attempt to run migrations automatically, but you should ensure you're restoring to a compatible version when possible.
Restore Process
During restoration, Immich will:
- Create a backup of the current database (restore point)
- Restore the selected backup
- Run database migrations if needed
- Perform a health check to verify the restore succeeded
If the restore fails (e.g., corrupted backup or missing admin user), Immich will automatically roll back to the restore point.
Restore via Command Line
For advanced users or automated recovery scenarios, you can restore a database backup using the command line.
- Linux system
- Windows system (PowerShell)
# Replace <DB_USERNAME> with the database username - usually postgres unless you have changed it.
# Replace <DB_DATABASE_NAME> with the database name - usually immich unless you have changed it.
docker exec -t immich_postgres pg_dump --clean --if-exists --dbname=<DB_DATABASE_NAME> --username=<DB_USERNAME> | gzip > "/path/to/backup/dump.sql.gz"
docker compose down -v  # CAUTION! Deletes all Immich data to start from scratch
## Uncomment the next line and replace DB_DATA_LOCATION with your Postgres path to permanently reset the Postgres database
# rm -rf DB_DATA_LOCATION # CAUTION! Deletes all Immich data to start from scratch
docker compose pull             # Update to latest version of Immich (if desired)
docker compose create           # Create Docker containers for Immich apps without running them
docker start immich_postgres    # Start Postgres server
sleep 10                        # Wait for Postgres server to start up
# Check the database user if you deviated from the default
# Replace <DB_USERNAME> with the database username - usually postgres unless you have changed it.
# Replace <DB_DATABASE_NAME> with the database name - usually immich unless you have changed it.
gunzip --stdout "/path/to/backup/dump.sql.gz" \
| sed "s/SELECT pg_catalog.set_config('search_path', '', false);/SELECT pg_catalog.set_config('search_path', 'public, pg_catalog', true);/g" \
| docker exec -i immich_postgres psql --dbname=<DB_DATABASE_NAME> --username=<DB_USERNAME> --single-transaction --set ON_ERROR_STOP=on  # Restore Backup
docker compose up -d            # Start remainder of Immich apps
# Replace <DB_USERNAME> with the database username - usually postgres unless you have changed it.
# Replace <DB_DATABASE_NAME> with the database name - usually immich unless you have changed it.
[System.IO.File]::WriteAllLines("C:\absolute\path\to\backup\dump.sql", (docker exec -t immich_postgres pg_dump --clean --if-exists --dbname=<DB_DATABASE_NAME> --username=<DB_USERNAME>))
docker compose down -v  # CAUTION! Deletes all Immich data to start from scratch
## Uncomment the next line and replace DB_DATA_LOCATION with your Postgres path to permanently reset the Postgres database
# Remove-Item -Recurse -Force DB_DATA_LOCATION # CAUTION! Deletes all Immich data to start from scratch
## You should mount the backup (as a volume, example: `- 'C:\path\to\backup\dump.sql:/dump.sql'`) into the immich_postgres container using the docker-compose.yml
docker compose pull                               # Update to latest version of Immich (if desired)
docker compose create                             # Create Docker containers for Immich apps without running them
docker start immich_postgres                      # Start Postgres server
sleep 10                                          # Wait for Postgres server to start up
docker exec -it immich_postgres bash              # Enter the Docker shell and run the following command
# If your backup ends in `.gz`, replace `cat` with `gunzip --stdout`
# Replace <DB_USERNAME> with the database username - usually postgres unless you have changed it.
# Replace <DB_DATABASE_NAME> with the database name - usually immich unless you have changed it.

cat "/dump.sql" | sed "s/SELECT pg_catalog.set_config('search_path', '', false);/SELECT pg_catalog.set_config('search_path', 'public, pg_catalog', true);/g" | psql --dbname=<DB_DATABASE_NAME> --username=<DB_USERNAME>  --single-transaction --set ON_ERROR_STOP=on
exit                                              # Exit the Docker shell
docker compose up -d                              # Start remainder of Immich apps
The backup and restore process changed in v2.5.0, if you have a backup created with an older version of Immich, use the documentation version selector to find manual restore instructions for your backup.
For the database restore to proceed properly, it requires a completely fresh install (i.e., the Immich server has never run since creating the Docker containers). If the Immich app has run, you may encounter Postgres conflicts (relation already exists, violated foreign key constraints, etc.). In this case, delete the DB_DATA_LOCATION folder to reset the database.
Some deployment methods make it difficult to start the database without also starting the server. In these cases, set the environment variable DB_SKIP_MIGRATIONS=true before starting the services. This prevents the server from running migrations that interfere with the restore process. Remove this variable and restart services after the database is restored.
The provided restore process ensures your database is never in a broken state by committing all changes in one transaction. This may be undesirable behaviour in some circumstances, you can disable it by removing --single-transaction --set ON_ERROR_STOP=on from the command.
Filesystem
Immich does not handle filesystem backups for you. You have to arrange these yourself!
Back up the entire contents of UPLOAD_LOCATION. If you want a smaller backup, the original content is the critical part and lives in these folders:
UPLOAD_LOCATION/libraryUPLOAD_LOCATION/uploadUPLOAD_LOCATION/profile
If you choose to back up only those folders, you will need to rerun the transcoding and thumbnail generation jobs for all assets after you restore from a backup.
For what each directory holds, including how the storage template changes the layout, see Storage locations.
If you moved some of these folders onto a different storage device, such as profile/, make sure to adjust the backup path to match your setup
Do not touch the files inside these folders under any circumstances except taking a backup. Changing or removing an asset can cause untracked and missing files. You can think of it as App-Which-Must-Not-Be-Named, the only access to viewing, changing and deleting assets is only through the mobile or browser interface.
Backup ordering
Stop the immich-server container while the backup runs. If nothing is changing, the database and the files cannot drift out of sync.
If stopping the container is not an option, back up the database first and the filesystem second. See consistency between the database and the files for why the order matters.